
DIY MINI CHRISTMAS TREE DECORATION
DIY MINI CHRISTMAS TREE
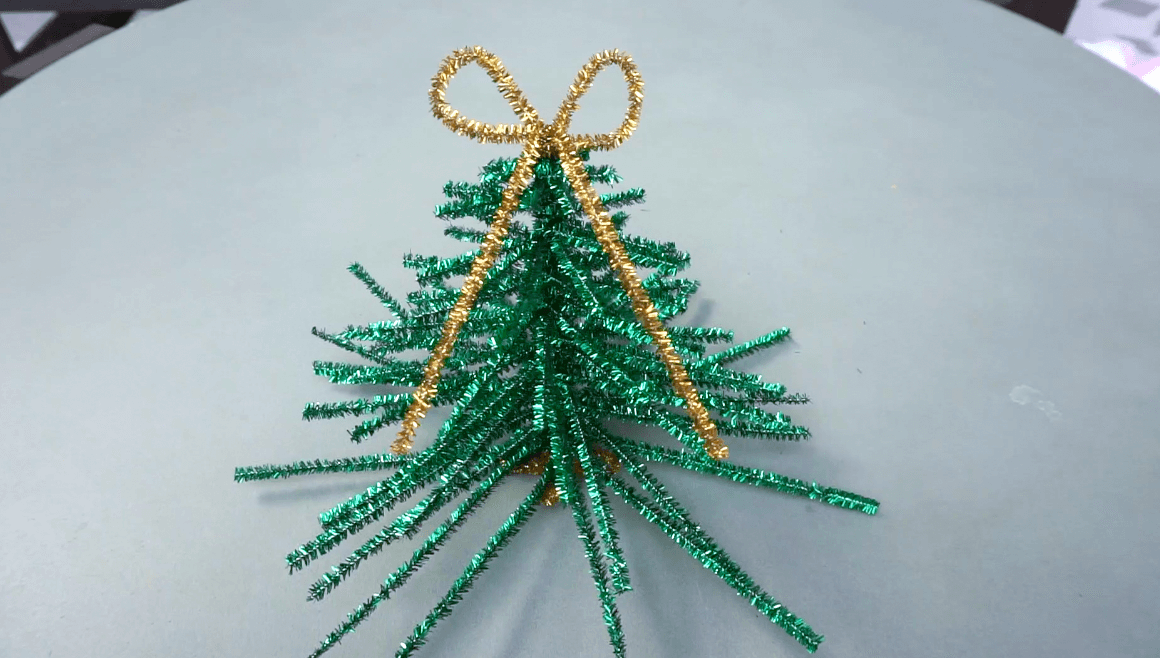
Last year, I was making Star of Davids out of pipe cleaners for a Hanukkah garland and this idea of making mini trees struck me and I ran with it! Before I knew it, I had a miniature standing tree with only 24 green pipe cleaners and 4 gold ones. A homemade Christmas decor idea, this is such a great and inexpensive way to give your little ones their own little tree to decorate! It is a fun, simple DIY you can do with your little ones for a Christmas-themed crafts activity. Plus, twisting and folding pipe cleaners is great fine motor skill practice!
YOU’LL NEED:
24 green pipe cleaners
4 gold pipe cleaners (or any color you want the ribbon to be)
HOW TO MAKE A CHRISTMAS TREE WITH PIPE CLEANERS
Make an L-shaped leg towards the bottom of each gold pipe cleaner. This will be the truck on the tree.
Cut off about half an inch from 4 green pipe cleaners. The large pieces will be placed on the bottom of the tree and the small ones will be at the top.
For every 4 pipe cleaners, cut off an extra half an inch gradually until you meet in the middle in terms of size.
Bend all pipe cleaners in half.
Using the largest size pipe cleaners, insert the gold “truck” into the fold and twist. Repeat this process adding in the other size pieces gradually until you reach the smallest ones.
You will see there is an additional gold pipe cleaner at the top. Use that to make a bow.
It’s really hard to explain that's why I made the video for a visual explanation.
HOW TO DECORATE MINI CHRISTMAS TREES
Oh, the holiday season is here, and it's time to spread some Christmas cheer! If you're looking to take this fun and festive Christmas craft even further, why not decorate your newly crafted mini Christmas trees? These small Christmas trees are not only adorable (as you can already see) but also the perfect canvas for allowing your kiddos to create their own personalized holiday masterpieces.
Start by adding some twinkling lights to your mini tree. Choose colorful pipe cleaners, cut them short, and bend them around the tree branches to create a “light” effect. Wrap them around the branches carefully, making sure to evenly distribute them for a magical effect.
Next, it's time to deck the halls with some Christmas ornaments. Get creative and have fun with this step! You can hang miniature baubles, and tiny snowflakes, or even craft your own ornaments using felt, pom-poms, or clay. The possibilities are endless! Just be sure their not too heavy or bulky. The smaller the better for your mini-tree.
For an extra special touch, add some festive ribbons or garlands around the tree with your red pipe cleaners. I love the red sparkly ones for this! This will add a pop of color and bring your mini Christmas tree to life.
Voila! Your mini Christmas tree is now ready to be the centerpiece of your holiday decor. Display it on a mantel, or shelf, or even create a mini winter wonderland scene with a few neighboring decorations.
With these mini Christmas tree crafts, you can let your kids’ creativity shine!
And there you have it, my festive friends! DIY mini Christmas trees are the perfect way to add a touch of holiday magic to your home. Whether you're a seasoned crafter or just starting out, these little trees are a joy to create and decorate. From lights to adorable ornaments, you can let your creativity shine and make each tree uniquely your own. So gather your supplies, gather your loved ones, and let the holiday crafting commence!
It's a wonderful way to spend time together, get into the holiday spirit, and create memories that will last a lifetime. Remember, it's not about perfection, it's about the joy of making something with your own two hands. So embrace the imperfections, sprinkle on some love and laughter, and let the DIY mini Christmas tree magic unfold. Wishing you all a season filled with warmth, creativity, and a sprinkle of whimsy. Happy crafting, my dear friends!