
5 EASY NO-BAKE RECIPES FOR KIDS: QUICK AND EASY SNACK IDEAS

During snack and mealtime, it’s always easier (and more convenient!) to toss everything together yourself, right? But inviting little ones into the kitchen, even for small steps, creates opportunities for connection, confidence, and lots of lifelong memories. Plus, children are naturally curious—they enjoy being part of the process more than you think!
However, the kitchen may feel like an intimidating space to share with kids. Sharp objects, hot surfaces—a lot is going on! That’s exactly why I love no-bake recipes. They’re safer, they make following directions much easier, and they allow littles to feel like they’re actually participating.
This isn’t the first time I’ve shared some of my favorite no-bake options before! From this homemade snackbar recipe to a creamy kid-approved hummus recipe, there are plenty of ways to get little ones involved. However, today, I’m sharing no-bake dessert ideas. Think rich cheesecake bites, creamy peanut butter treats, and healthy (yes, I said healthy!) chocolate brownies. Each recipe will be as yummy as it is exciting to make. Let’s dive in!

5 Easy No-Bake Recipes for Kids: Quick and Easy Snack Ideas
Some of the sweetest memories are made in the kitchen. Giggling about spilled milk, wiping cheeks with flour, and licking chocolatey spoons—these are the moments you’ll remember forever. And, of course, making hidden vegetable mac and cheese or kid-friendly crockpot recipes can be just as special.
But sometimes? You just want something sweet, easy, and ready in minutes—without turning the oven on or scrubbing dishes all night! Plus, these simple recipes offer the perfect break in between scrolling gift guides and playing with clear slime (motherhood, right?!).
Before we dive into a handful of my favorites, let’s take a second to talk about what no-bake recipes are—and what makes them so special for kids.
What Are No-Bake Recipes?
No-bake recipes are dishes that are prepared without traditional cooking appliances—pretty much what it sounds like! They’re snacks, meals, desserts, or treats you can make that require no oven, no baking, and no cooking. Sometimes recipes call for a little stovetop work to melt butter, oil, or toppings. But for the most part, these recipes come together with minimal heat and maximum convenience!
Here are a few simple Q&As that can show you exactly why they’re such a popular option:
Are no-bake recipes safe to eat?
Yes, absolutely! No-bake items generally require shelf-stable, heat-treated, and refrigerated ingredients. That means no raw eggs, flour, or doughs that carry a higher risk of bacteria.
Do no-bake recipes need to be refrigerated?
For the most part, yes. You can leave some recipes out on the counter. However, storing them in the fridge or freezer will make them last longer, taste yummier, and maintain an ideal consistency.
How long do no-bake recipes last?
It all depends on the ingredients you’re using! For a no-bake cheesecake, you can safely snack on it for 3-5 days as long as you refrigerate it. No-bake brownies, on the other hand, can often last up to 2 weeks in the fridge—or 2-3 months in the freezer!
For any recipe, it’s best to keep them in an airtight container to keep them safe and yummy.
Why Are No-Bake Recipes Great for Kids?
No-bake recipes are the best way to introduce little ones to the kitchen. For one, they can safely explore, develop hands-on skills, and improve their confidence—without running into hot surfaces, sharp cookware, or complicated techniques. It’s also a FANTASTIC way to introduce STEM concepts!
Here’s a quick overview of all the benefits parents can expect when introducing kids to no-bake recipes:
Generally Safer: You can still make yummy recipes without hot surfaces, boiling water, or risky cookware. It's the best of both worlds!
Builds Fine Motor Skills: Kids use those tiny hand muscles as they cut, whisk, pour, and knead. Those muscles and movements are essential for things like writing, brushing teeth, tying shoes, and using utensils.
Boosts Confidence: Nothing beats the confidence boost kids get when they watch something they put effort into come to life. No-bake recipes are a huge, hands-on way to foster a sense of accomplishment!
Encourages Sensory Play: Yes, no-bake recipes ARE a form of sensory play! All five senses are engaged here—sight, sound, smell, touch, and taste. In turn, this builds a ton of other developmental skills! If you want to learn more about this, visit “5 Senses Arts and Crafts for Preschoolers.”
Improves Math Skills: Cooking and baking both involve lots of measurements. Counting, ratios, proportions, timing—it all matters here. Kids can practice these through every step of the process!
Promotes Mindful Eating: For many kids with texture aversions or food sensitivities, a lot of the hesitation stems from the unknown. When they’re involved in making something, they become familiar with the ingredients. They’re much more likely to try new things when they’re comfortable with it!
5 Kid-Friendly No-Bake Recipes
Kid-Friendly No-Bake Cheesecake Bites
What’s better than a no-bake cheesecake? No-bake cheesecake bites! Yummy, easy to make, and perfectly sized for kids. Plus, these make the best on-the-go treats during busy days or breaks between Printable Activity Packs!
Ingredients for No-Bake Cheesecake Crust:
¾ cup graham cracker crumbs
3 tbsp unsalted butter or coconut oil
Optional: 1 tbsp honey for added natural sweetness
Ingredients for No-Bake Cheesecake Filling:
8 oz. cream cheese
¼ cup plain Greek yogurt
2 tsp lemon juice
1 tsp vanilla extract
Optional: fresh fruit for topping
Instructions for No-Bake Cheesecake:
Step 1: Place graham crackers in a Ziploc bag, hand over a mini rolling pin, and let your child start crushing! Double-check their work to make sure everything is super finely crushed. Then, combine the graham cracker crumbs with melted butter, mixing well.
Step 2: Spoon a small amount of the crust into muffin cups. Press it down to make sure it’s nice and firm.
Step 3: Using a hand or stand mixer, blend all of your filling ingredients together. For littles, you’ll definitely want to supervise (or take over) here! You’ll know it’s ready when it’s firm and begins to form small peaks.
Step 4: Add your filling to your muffin cups. I usually aim for about 1 ½ tablespoons, but this is your call here! Use however much you need to fill each cup up.
Step 5: Lightly place your fresh fruit on top. My kids love raspberries, blueberries, strawberries, and blackberries—but feel free to customize!
Step 6: Place in the refrigerator for 2 hours (or overnight) and enjoy!
Kid-Friendly No-Bake Chocolate Peanut Butter Cups
Thanks to the antioxidants, fiber, minerals, and vitamins from the oats, this recipe is much healthier than traditional peanut butter cups! Plus, peanut butter is packed with protein, and coconut oil boosts “good” cholesterol. It’s a recipe that kids and adults will love.
Ingredients for the Base of No-Bake Chocolate Peanut Butter Cups:
First layer:
2 cups rolled or steel-cut oats
2 tbsp maple syrup
1 tsp vanilla extract
Pinch of sea salt
3 tbsp creamy peanut butter
Second Layer:
5 tbsp milk, semisweet, or dark chocolate chips, melted
2 tbsp coconut oil
Topping:
6 tbsp creamy peanut butter
1 tsp maple syrup
Pinch of sea salt
Instructions for No-Bake Chocolate Peanut Butter Cups:
Step 1: We’re working in layers, so get all of your ingredients ready! This saves confusion during each step.
Step 2: Before mixing, line a muffin tin. This makes the cups easier to scoop out later on!
Step 3: For the first layer, combine all of your ingredients into a bowl. Make sure you encourage kiddos to mix well! Once you’re happy with the distribution, pack this layer into each cup.
Step 4: In a microwave-safe bowl, add in your chocolate chips and coconut oil. Heat at 15-second intervals, mixing each time the bowl comes out. Once it’s nice and silky, add it over your first layer!
Step 5: Set your treat in the refrigerator for 15 minutes or a freezer for 5 minutes. This helps everything set before moving on.
Step 6: This is the easy part! Mix your peanut butter and maple syrup in a bowl until well blended. Add your topping onto the cups—don’t forget the sea salt!
Step 7: Set it back in the freezer for 45 minutes, or until the cups are solid. Voila!
Kid-Friendly No-Bake Energy Bites
Sometimes you just want a small treat that’s as good for you as it tastes. Fortunately, these mini no-bake energy bites do just the thing! Full of flaxseed, honey, oats, and white chocolate, consider this the yummiest dose of protein you’ll ever have. And the best part? They fit perfectly into these small snack box sets for lunch or snacktime!
Ingredients for No-Bake Energy Bites:
1 cup old-fashioned or steel-cut oats
½ cup white chocolate chips (adds the perfect touch of sweetness!)
⅓ cup honey
1 tsp vanilla extract
½ cup milled chia seeds
½ cup creamy peanut butter
Optional: Dried cranberries
Instructions for No-Bake Energy Bites:
Step 1: Add all of your ingredients to a bowl. Yep, no need to separate, melt, or measure—just add and combine! It’s super quick and easy.
Step 2: Now that everything’s in the same bowl, mix thoroughly. The peanut butter and honey will essentially “stick” everything together! If your little ones are having a hard time, feel free to step in and help mix.
Step 3: Begin taking a little bit of the mixture out at a time and rolling it into balls. You can use your hands or an ice cream scoop here—the scoop will give you a more uniform result. Then, just place them onto a lined baking sheet.
Step 4: Once you’ve worked through the entire mixture and your baking sheet is full, place it into the freezer. Leave them there for just a couple of hours, and then they’ll be ready to enjoy!
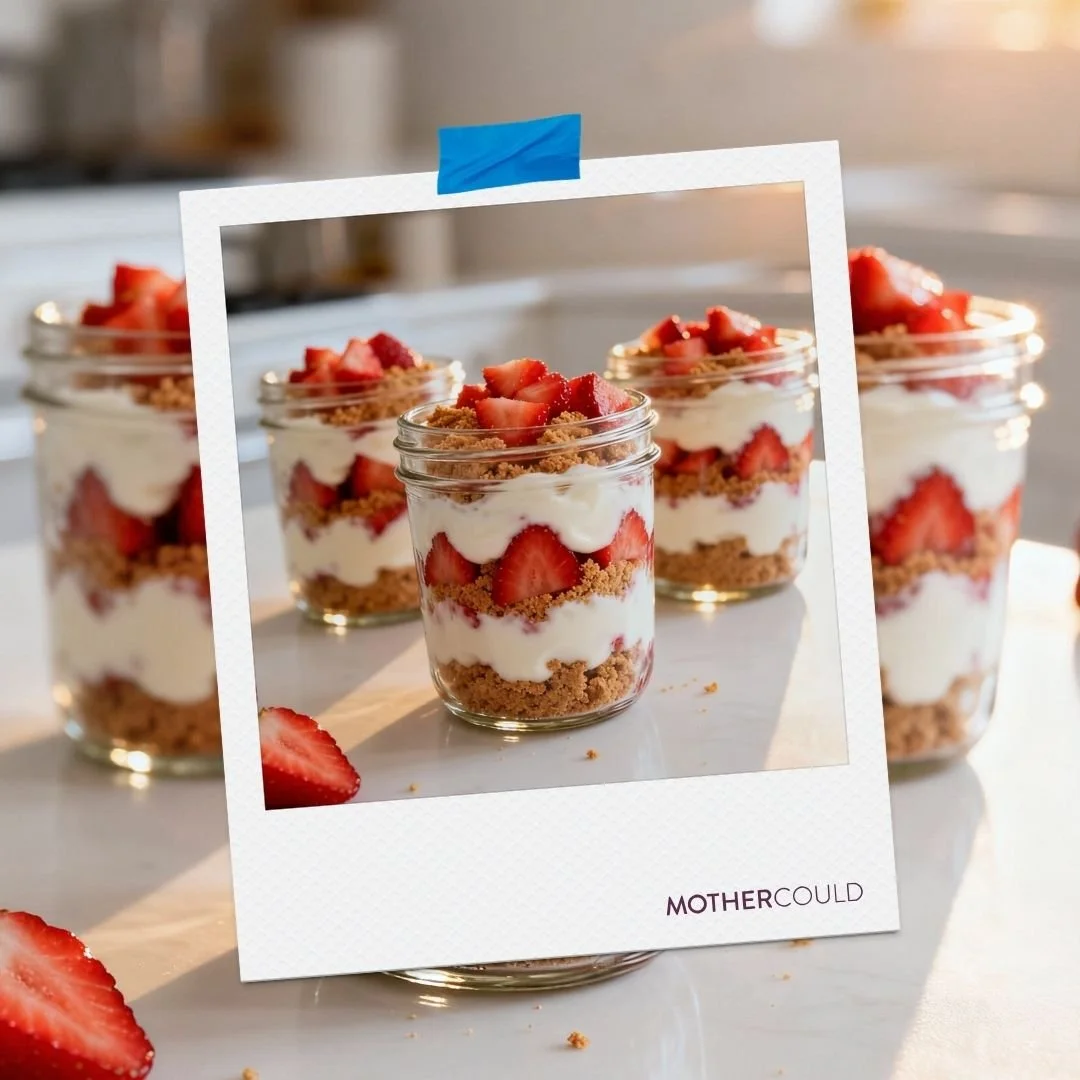
Kid-Friendly No-Bake Strawberry Shortcake Cups
There are two reigning champs in the dessert world in my home: strawberry shortcake and this kid-friendly yogurt parfait recipe. So, I thought, why not combine them to get the best of both worlds?! A little sweet, a little fluffy, and 100% delicious, this recipe is bound to become a family favorite.
Ingredients for No-Bake Strawberry Shortcake Cups:
1 ½ tbsp honey or maple syrup
2 cups fresh strawberries, diced
1 cup vanilla Greek yogurt
1 cup Vanilla graham crackers (or, for a healthier alternative, Annie’s Organic Baked Bunny Grahams)
Optional add-ins: Chia seeds and a sprinkle of cinnamon
Instructions for No-Bake Strawberry Shortcake Cups:
Step 1: In a small bowl, mix your diced strawberries with the honey or maple syrup. Then, let this set for a few minutes so the strawberries have time to really soak in the sweetness!
Step 2: To make things easier, add your Greek yogurt and a drizzle of honey into a separate bowl and mix. This helps make sure you get that natural, yummy flavor in each bite. If you’re using chia seeds, you can mix them in now, too!
Step 3: Add your graham crackers or Bunny Grahams to a Ziploc bag, seal it, and crush them until they’re tiny, fine crumbs. Kids love this step, so if they’re old enough, I definitely recommend handing off the job!
Step 4: Once everything is all mixed, crushed, and ready to go, it’s time to assemble! In a small cup or jar, start with a layer of graham crackers. Now, add a thin layer of yogurt. And finally, add on a layer of strawberries. Continue doing this until the cup is full.
Step 5: For a fun topping, add a couple of diced strawberries, a dash of cinnamon, or a touch of whipped cream. Yum!
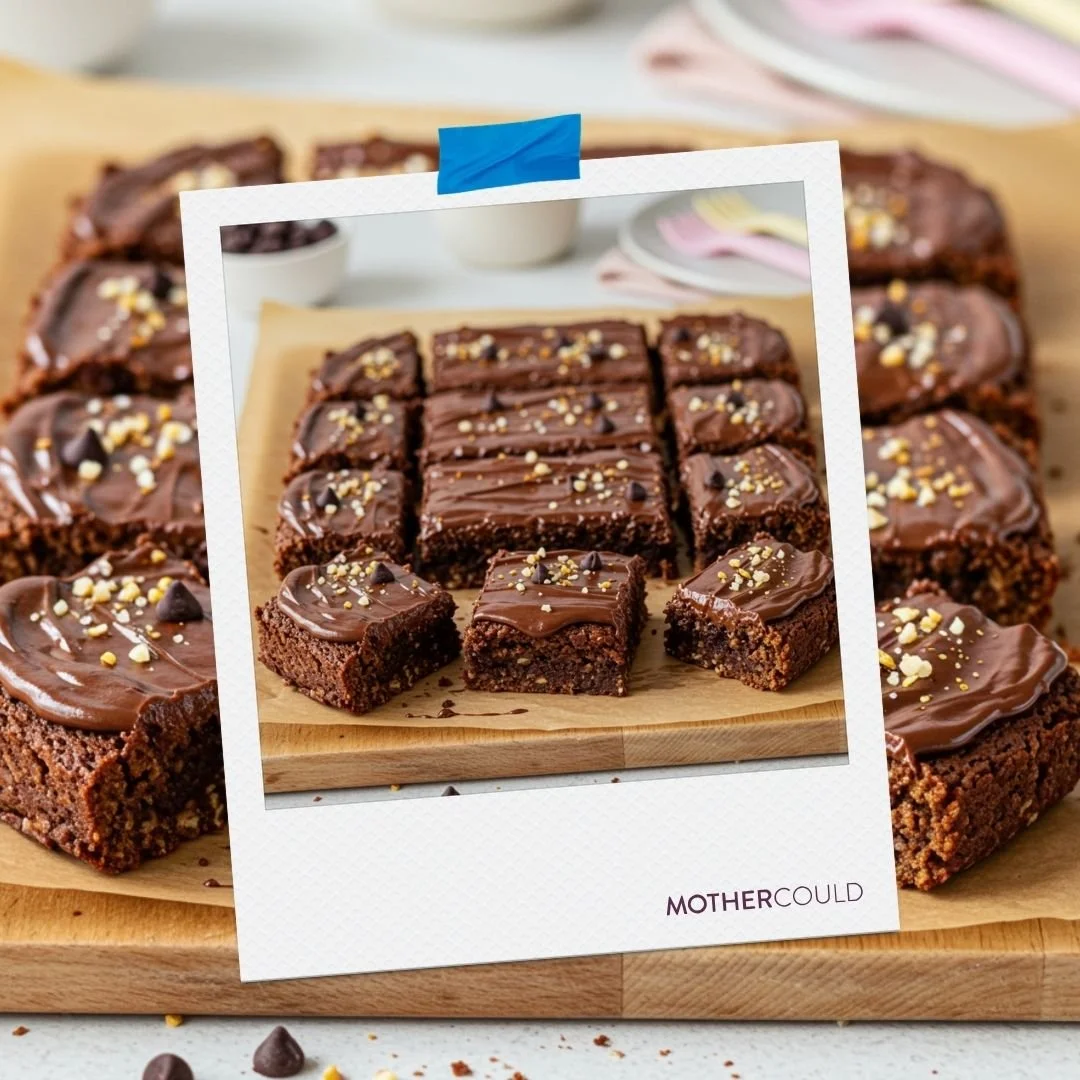
Kid-Friendly No-Bake Chocolate Brownies
What if I told you that you could make healthy, kid-friendly brownies, without 100 ingredients or an oven? And then what if I told you that they’re also gluten-free? Sounds too good to be true, right? Great news, it’s totally possible! This easy, no-bake treat is one of my favorites—and I hope it’ll be one of yours, too.
Ingredients for No-Bake Chocolate Brownies
1 ½ cups pitted Medjool dates, pitted
¼ cup cocoa powder
1 tsp vanilla extract
Pinch of salt
Optional: Chopped walnuts, almonds, or pecans
Optional: ¼ cup mini dairy-free chocolate chips
Ingredients for Icing:
¼ cup melted coconut oil
½ cup unsweetened cocoa powder
¼ cup maple syrup
Instructions for No-Bake Chocolate Brownies:
Step 1: If you’re using nuts, add them to a food processor and pulse until everything’s evenly ground. Then, add your dates, salt, and cocoa powder, pulsing again until everything looks thick and creamy. Make sure you taste as you go! This helps you tweak the taste, sweetness, and consistency to your liking.
Step 2: Line a baking pan (don’t worry, it won’t be going into the oven!) with parchment paper. Then, press your mixture into the baking pan, using a spoon to smooth everything down. Put it in the refrigerator for 1 hour (or overnight).
Step 3: While you’re waiting for the brownies to harden, make your icing! Just combine melted coconut oil and cocoa powder and mix until thick. Wait to add the maple syrup until the end; otherwise, it can thicken too much. Then, you’ll want to pour the icing immediately—it hardens up fast!
Step 4: Once you take the brownies out of the fridge, pour on your icing. Place them back into the refrigerator for 30 minutes so the icing can harden, and ta-da! Your no-bake brownies are ready!
No-bake recipes aren’t just yummy—they’re a great way to foster essential developmental skills!
Sometimes, easier doesn’t mean better. Of course, as parents, we’re able to toss together a sweet treat in just a few minutes. But when you invite little ones to help, you’re fostering their curiosity, encouraging developmental skills, and laying the foundation for the sweetest bonding time! Plus, a plate full of no-bake brownies or cheesecake bites at the end just makes everything even more exciting.
Looking for other ways to raise confident, creative, independent children? Check out our new book, Playful by Design! This resource is dedicated to creating thoughtfully designed play spaces that reduce clutter, encourage self-directed play, and transform boredom into an opportunity for creativity. Best of all? Parents get the space and time to slow down and catch their breath!
Don’t stop there, though! On the Mothercould blog, you can find plenty of sensory play activities, kid-friendly recipes, and helpful cleaning hacks. I also have direct links to Mothercould products, my weekly favorites, and my LTK shop—all linked to products designed to make parenthood easier.
And, of course, don’t forget to join Mothercould In Your Pocket! This resource offers 60+ printable recipes, guided tutorials, sensory play activities, effective clean-up strategies, and my all-time favorite hacks.