
5 FUN COOKIES TO MAKE WITH KIDS USING SIMPLE INGREDIENTS
Spending the afternoon baking cookies with kids is both a fun, memorable activity and a valuable learning experience. And I get it, as parents, we tend to keep our kids far from the kitchen. The mess, the hot surfaces, the pointy objects—it’s intimidating! However, the developmental benefits of letting kids help cook and bake don’t stop at the kitchen.
Think of all the different tasks you’re responsible for while you bake, like following instructions, practicing patience, and expressing creativity. As adults, this is something we’re totally accustomed to. But for children? It’s a hands-on learning experience that boosts mental and physical development—from fine motor skills to confidence in following directions.
And what better way to introduce the kitchen than by baking a sweet treat? Today I’m sharing kid-friendly, fun cookie recipes with simple steps, easy ingredients, and plenty of opportunities for little helpers to join in. And we’re not figuring out how to make Betty Crocker cookies better—we’re making these goodies from scratch!
5 Fun Cookies to Make with Kids Using Simple Ingredients
When introducing kids to the baking world, short prep and bake times, doughs that are easy to work with, and simple, familiar ingredients are key. And, as I’m sure you’ve noticed, a lot of cookie recipes feature steps that children don’t have the patience or desire to follow.
Chilling dough, precisely measuring, mixing for 5 minutes—they want quick, simple, and easy. And fortunately, that’s exactly what the cookie recipes below offer! Trust me, I’m no stranger to efficiency. Hence; my “Easy No-bake Recipes for Kids” and “Easy Recipes for Kids to Make at Home” posts!
So, if you came looking for easy cookie recipes that kids will actually enjoy making, you’re in the right place. I’ll also explain why baking with kids is so beneficial and offer tips to make the experience fun and smooth.
What Are the Benefits of Baking with Kids?
Builds Early Math and Reading Skills
Teaching children math and reading skills? Not an easy job for anyone involved. However, spending time in the kitchen is a fantastic way to encourage these skills, stress- and formula-free.
Kids can practice reading recipes, messily measuring ingredients, learning new descriptive words, and counting steps outloud. And the best part? They can practice at their own pace!
Encourages Independence and Confidence
When you think about it, independence is a combination of tons of skills. Responsibility, following directions, problem-solving, decision-making, the list goes on! And as I talk about in my book, Playful by Design, independence truly sets the foundation for capable, confident kiddos.
So, how does baking encourage independence? The more you let kids take over tasks, like measuring, decorating, stirring, or pouring, the more capable they feel. That sense of accomplishment then spills over into their everyday actions! Suddenly, they’ll be choosing their own clothes, brushing their own teeth, and making drinks without help.
Supports Sensory Development
Sensory development is incredibly important for growing little ones. Because, like I discussed in “Five Senses Arts and Crafts,” kids use every one of their senses to explore the world around them! While baking, we’re immersed in a wonderful world of different textures, tastes, smells, sights, and sounds.
This isn’t just beneficial for exploration. It also supports early learning, fine motor practice, and information processing as kids gain confidence through hands-on experiences.
Creates Positive Associations with Food
Dealing with picky eaters or kids with texture sensitivities? You’re not alone! But there’s good news. Research shows that, even though their perception of the food doesn’t always change, kids are more likely to eat more of the food they prepared themselves. But how, exactly?
When you involve kids in the baking process, you aren’t just laying a mysterious treat in front of them. You’re offering them something they helped create! And because they had experience with the textures, sights, and smells, they feel more comfortable trying it. It’s like parenting magic.
Fosters Creativity
We’ve all heard the classic rule: “Cooking is an art, but baking is a science.” However, baking with kids isn’t always as straightforward. Let them experiment with flavors, modify decor, and add their own little expressive twist. Doing so allows them to explore their creativity—and create unique, personalized treats!
What Are the Best Cookies to Make with Kids?
When it comes to kids helping in the kitchen, you’re the best judge here! For littles, they can help stir, pour, or measure ingredients. Or, if you want to really work on those fine motor skills, ask them to knead the dough!
Older kids, on the other hand, naturally do better with a little extra freedom. Have them use electric mixers, chop ingredients, or manage stovetop tasks. Regardless, each recipe is easy to make and offers plenty of opportunities for kids of all ages to help!
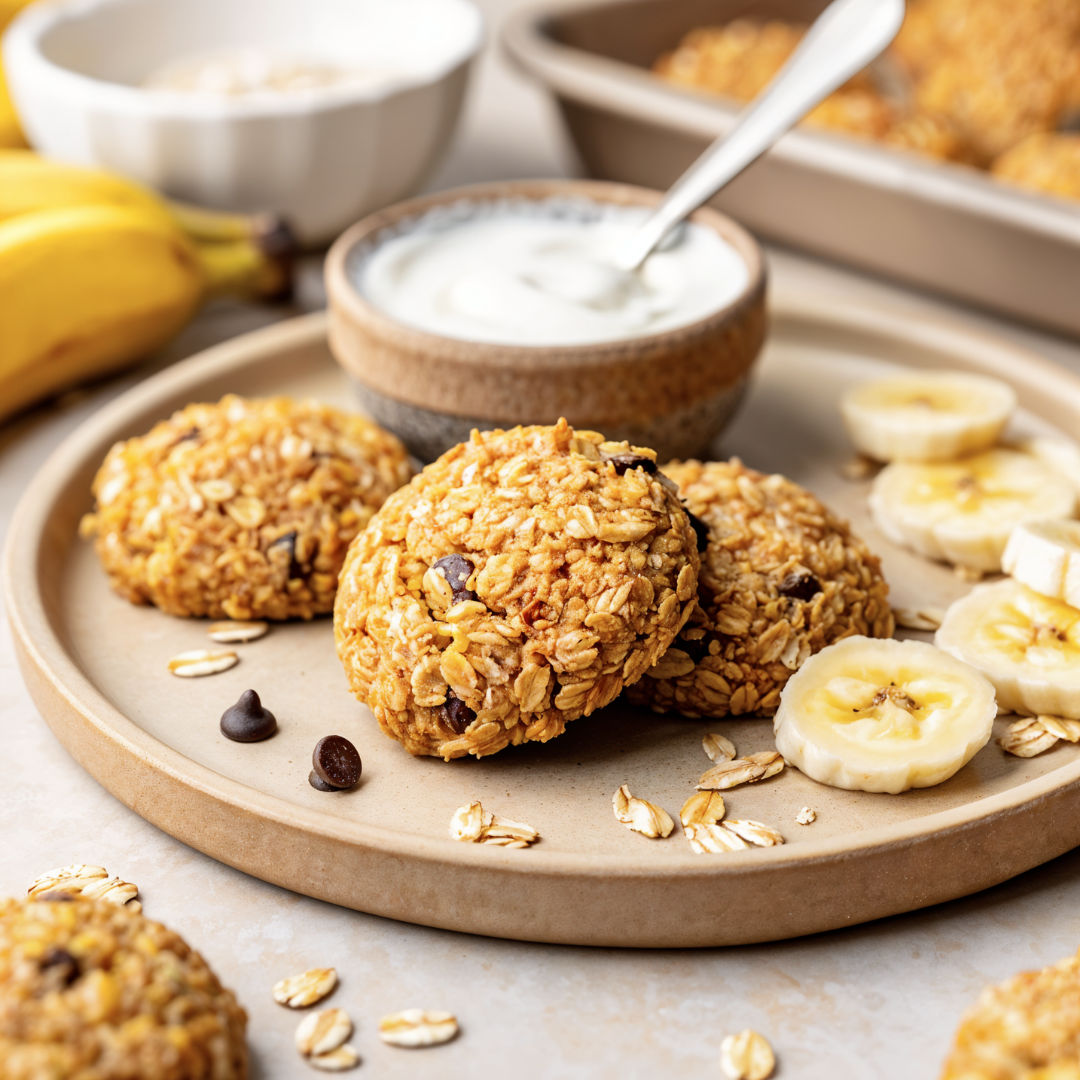
Banana Oatmeal Breakfast Cookies
“Cookies” and “breakfast” in the same sentence?! It’s a real thing—and it’s much healthier than you may think. This recipe contains all the same ingredients you’d use in similar breakfast ideas. Instead, it’s just in cookie form!
Ingredients:
1 cup mashed ripe banana
½ cup old-fashioned rolled oats
1 ½ tsp baking powder
Salt to taste
½ tsp cinnamon
1 ½ tsp vanilla extract
⅓ cup peanut or almond butter
2 eggs
Optional: mini chocolate chips
Optional: 1–2 tbsp maple honey or syrup (unless bananas are very ripe)
Instructions:
Step 1: Preheat your oven to 350°F. While you wait, line a baking sheet with parchment paper.
Step 2: Before you add all the ingredients together, place your banana in a large bowl and mash it first. I recommend mashing it until it’s super smooth—kids can be a little iffy about textures!
Step 3: Add all of your remaining ingredients to the bowl with the mashed banana. Stir everything until well combined. The dough should feel thick and look wet—don’t stress! This is exactly how it’s supposed to look.
Step 4: Use a spoon (or an ice cream scoop!) to add your dough onto the baking sheet. Gently press each scoop to make it slightly flat. ½-inch thick is thin enough to make sure it cooks all the way through.
Step 4: For a firmer, chewier cookie, bake for 15–20 minutes. For a soft, cloud-like texture, bake for 12–15 minutes. Make sure to keep an eye on those edges!
Step 5: Once they’re slightly warm, serve with banana slices or yogurt. So yummy and healthy!
If you’re a banana-loving household, make sure to also check out: “Banana Smoothie Bowl Recipe” and “Homemade Banana Muffin Recipe.”
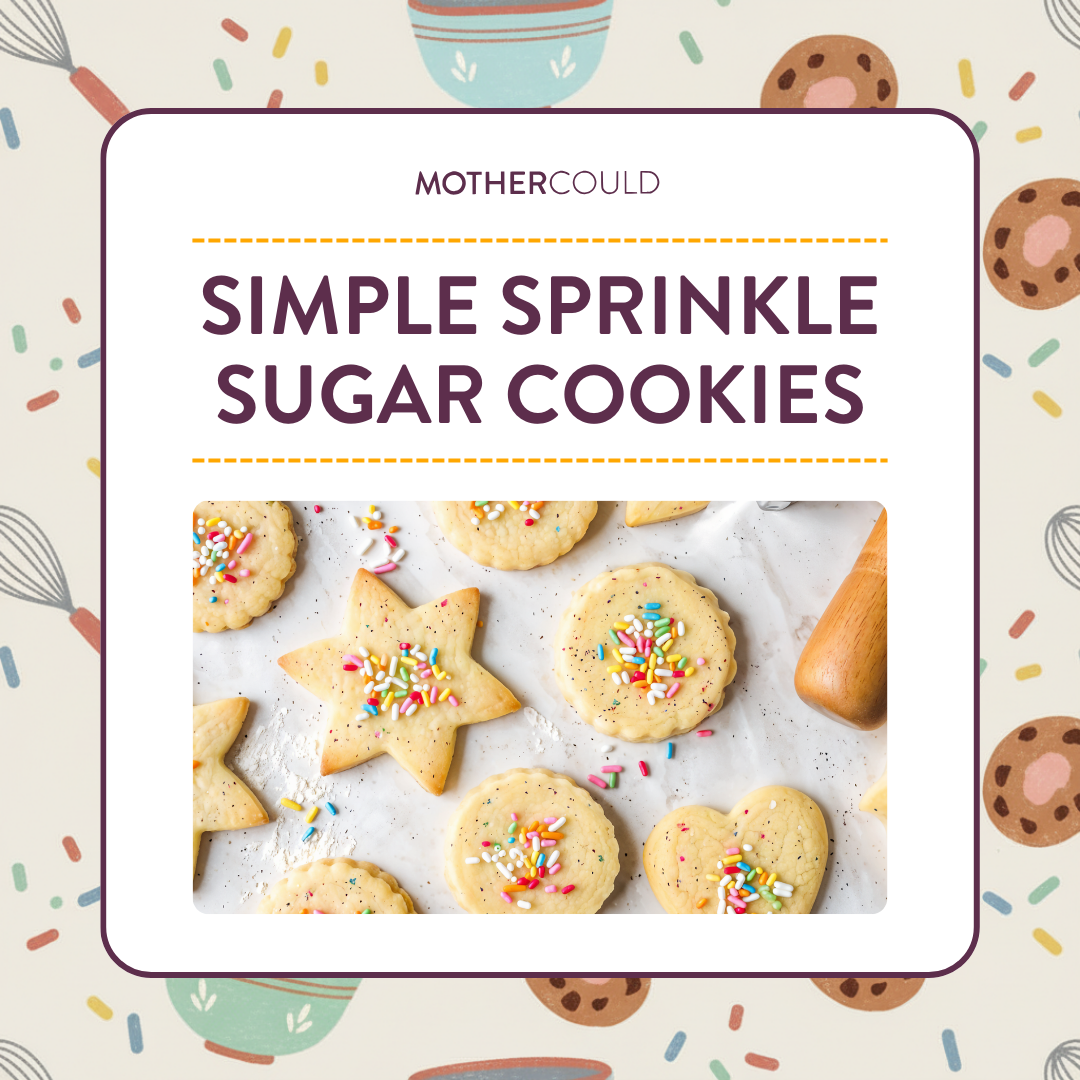
Simple Sprinkle Sugar Cookies
Sugar topped with more sugar—it’s a treat every kid deserves from time to time! Not only are sugar cookies incredibly easy to make, but little ones helping out in the kitchen LOVE being in charge of adding sprinkles. And the best part? You can cut out unique shapes, making the process all the more exciting!
Ingredients:
2 ½ cups all-purpose flour
1 cup butter, room temperature
½ tsp baking powder
1 tsp vanilla extract
Salt to taste
1 large egg
1 cup white sugar
⅓ cup rainbow sprinkles
Instructions:
Step 1: Preheat your oven to 375°F. As it warms, go ahead and gather all of your ingredients.
Step 2: In a large bowl, mix your all-purpose flour, baking powder, and rainbow sprinkles.
Step 3: In a separate bowl, beat the sugar and butter until smooth. After you’re happy with the consistency, add in your egg, vanilla extract, and salt, and beat again.
Step 4: Gradually add in your flour and baking powder mix. Key word here: gradually! I recommend adding a cup at a time and mixing after each round. This just helps everything blend evenly—and avoids a mess!
Step 5: Lay out a piece of parchment paper and dust it with flour. Then roll and flatten your dough on the parchment paper and use the cookie cutter to cut out shapes.
Step 6: Place your cookies on the baking sheet and bake for 8–12 minutes. Serve and enjoy!
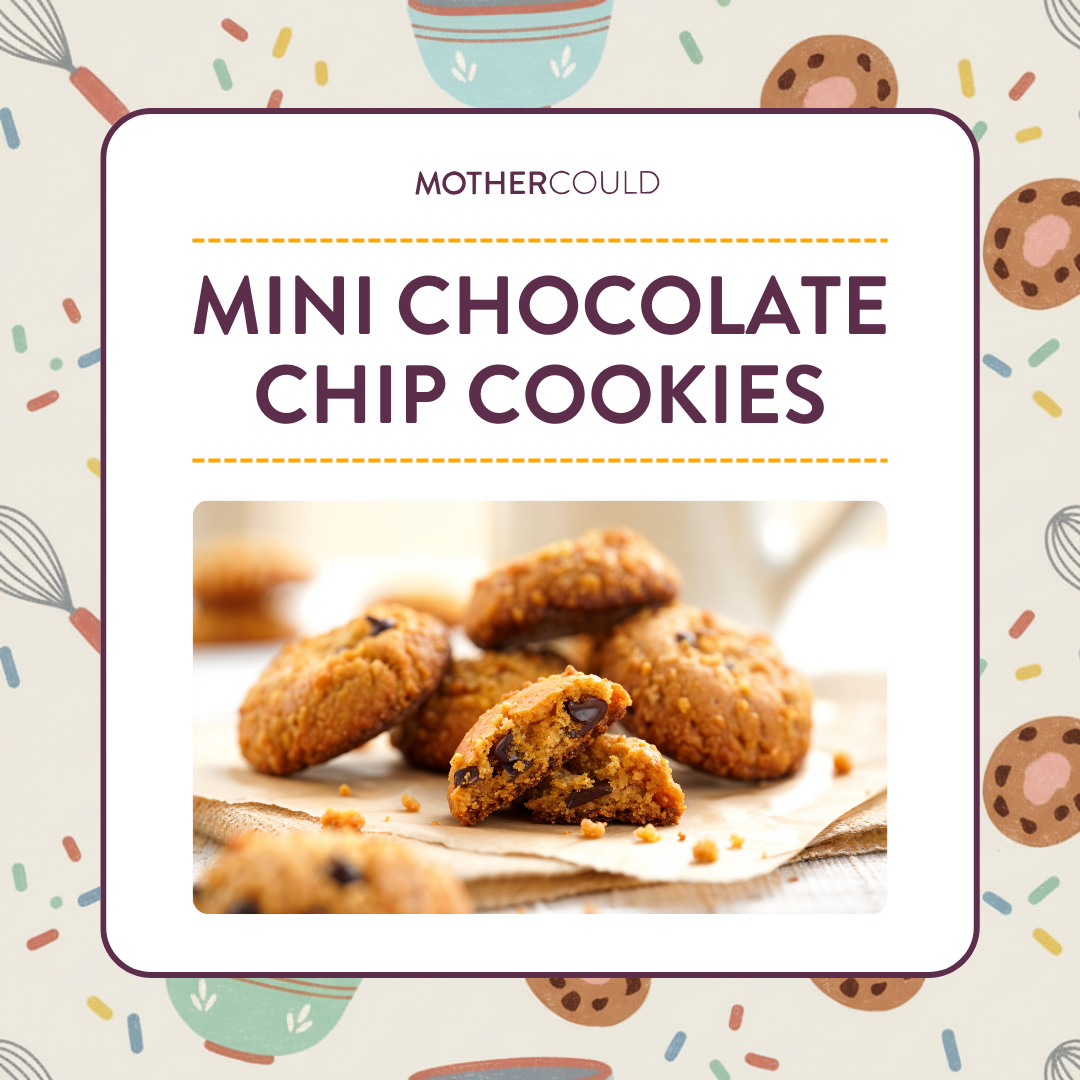
Mini Chocolate Chip Cookies
I can’t make a post about fun cookies to make with kids and not share a chocolate chip cookie recipe! Except here, we’re making mini cookies. Easy to eat, great for simple snacking, and fantastic if you’re trying not to over-indulge. (Guilty!)
Ingredients:
1 ½ cup all-purpose flour
⅔ cup mini chocolate chips
½ tsp baking soda
½ tsp baking powder
1 large egg
¼ tsp salt
1 tsp vanilla extract
3 tbsp white granulated sugar
2 ½ tbsp packed brown sugar
⅓ cup unsalted butter, room temperature
Instructions:
Step 1: Preheat your oven to 350°F and line a baking sheet with parchment paper. Or, you can swap out parchment paper for non-stick spray! Either one works.
Step 2: Add your baking soda, baking powder, flour, and salt to a medium bowl. Whisk until combined.
Step 3: In a separate bowl, combine your butter, white sugar, and brown sugar, and beat until smooth. Now, add your vanilla extract and egg, and beat again. You want everything to look creamy and well combined.
Step 4: Slowly add your flour and powder mix into the bowl with the butter, egg, and sugar. Using your hands or a silicone spatula, gently fold the mixture until everything is blended together.
Step 5: Pour the mini chocolate chips into the mixture. Same as before, use your hands or a spatula to fold the chips into the dough.
Step 6: Roll the dough into small balls and place them onto the baking sheet. Pro tip: Use the bottom of a cup to gently flatten each cookie!
Step 7: Bake for 7–10 minutes and enjoy!

Chewy Peanut Butter Cookies
Who doesn’t love a good peanut butter cookie? They’re soft, naturally sweet, and oh-so-yummy for mid-day or after-dinner treats! Plus, they’re full of plant-based protein and heart-healthy monounsaturated fats. And, honestly, that’s enough for me to consider it a healthier alternative to sugar-filled store-bought treats.
Ingredients:
½ cup unsalted butter, room temperature
1 cup creamy peanut butter
½ cup packed brown sugar
4 tbsp white granulated sugar
1 tsp vanilla extract
1 large egg
¾ tsp baking powder
½ tsp baking soda
1 ⅓ cup all-purpose flour
Salt to taste
Instructions:
Step 1: Preheat the oven to 350°F and line a baking sheet with parchment paper. You can also spray the sheet with non-stick spray.
Step 2: In a medium bowl, cream together the butter, peanut butter, brown sugar, and granulated sugar until smooth and fluffy.
Step 3: Add in your vanilla extract and egg. Mix until fully combined.
Step 4: Sprinkle in the baking powder, baking soda, and salt. Stir again until everything is evenly mixed.
Step 5: Add your all-purpose flour slowly and gradually. You want to mix until a soft dough forms. For perfectly chewy cookies, as tempting as it may be, avoid overmixing!
Step 6: Scoop your dough into tablespoon-sized balls and place them on your prepared baking sheet. Use the bottom of a clean cup to gently flatten them.
Step 7: Here’s the fun part! Use a fork to press a crisscross pattern on top of each cookie.
Step 8: Bake for 10–12 minutes, or until the edges look set. Allow them to cool and enjoy!

Gluten-Free Hidden Veggie Oatmeal Cookies
What if I told you that you can make oatmeal cookies that are gluten-free and full of hidden veggies? Probably sounds too good to be true, but it’s not! This cookie recipe is healthy, sneaks in a ton of nutrients, and is super easy to make! Your kids will ask for it again and again, without even knowing it’s a treat full of good-for-you ingredients!
Instructions:
1 cup gluten-free rolled oats
¾ cup gluten-free all-purpose flour (with xanthan gum)
½ tsp baking soda
½ tsp cinnamon
¼ tsp salt
½ cup unsalted butter, room temperature
½ cup brown or coconut sugar
1 large egg
1 tsp vanilla extract
¾ cup zucchini or carrot, finely grated and moisture squeezed out
¼ cup unsweetened applesauce
Optional add-ins: mini chocolate chips or raisins
Instructions:
Step 1: Preheat the oven to 350°F and line a baking sheet with parchment paper. Set aside.
Step 2: In a medium bowl, whisk together all of your dry ingredients. These will be the gluten-free oats, flour, baking soda, cinnamon, and salt.
Step 3: Now it’s time to mix your wet ingredients! Combine the egg, vanilla extract, and applesauce, and mix until it's fully combined.
Step 4: Fold in your finely grated veggies into the wet mix. Now, gradually stir in your dry ingredients until the dough is thick and fluffy.
Step 5: Add in those additional ingredients! Both chocolate chips and raisins act as natural sweeteners, so you can’t go wrong either way.
Step 6: Scoop the dough into tablespoon-sized portions and place them onto the baking sheet. Use the bottom of a clean glass to gently flatten each cookie.
Step 7: Bake the cookies for 10–12 minutes, or until the edges begin to brown. After the cookies cool, serve and enjoy!
How to Bake Cookies with Kids
Pre-Measure Ingredients
When baking with kids, you definitely won’t want to be sprinting all around the kitchen for ingredients and measuring cups. Save yourself the trouble by pre-measuring ingredients and placing them in small bowls. It reduces mess, keeps kids engaged, and avoids the stress of incorrect measurements later.
Assign Age-Appropriate Tasks
A lot of baking with kids involves assigning safe, age-appropriate tasks—and there are two reasons for this. First, it keeps everyone safe. You don’t want littles handling sharp tools or hot surfaces, of course! Second, it builds confidence. The more equipped they are to complete a task start-to-finish, the more self-assured they’ll become.
Simplify Clean-Up
I think we can all agree that the clean-up after baking is the worst. All the dishes piling up in the sink? It’s enough to make a lot of us skip baking altogether! However, I have a few tricks up my sleeve for helping you save your kitchen and your sanity from toddler-assisted baking disasters:
Line Surfaces. Parchment paper, paper towels, tablecloths, old dish rags—use them all. Then, once you’re done, all you have to do is toss things in the trash or throw them in the washing machine.
Pre-Measure Ingredients. Having a 5-year-old pour flour into a measuring cup? Risky business! Instead, pre-measure ingredients and set them aside. Kids can still pour them in, it just won’t be as chaotic.
Use Deep Bowls. Small, shallow bowls have lots of room for error. Instead, make sure you use wide, deep mixing bowls to avoid accidental spills.
Keep a “Dirty” Bowl. Each time you’re done with a utensil, set it in the “dirty bowl” until it’s time to wash all the dishes. Not only does this keep you from having to leave the baking station, but it also keeps everything in one confined space.
Soak Items Immediately. If any of your bowls or baking sheets have sticky, sweet ingredients on them, soak them ASAP! This keeps you from having to scrub hard residue later.
Structure Baking in Short Steps
Regardless of age, children tend to have super short attention spans. We know this, and we’re used to accommodating that during playtime! Follow those same strategies during baking and cooking, too. Keep steps short, lists simple, and recipes easy to follow. It keeps children engaged and involved throughout the process.
Baking with kids isn’t just great for bonding; it’s great for development, too!
It’s easy to feel hesitant about inviting kids into the kitchen to help cook, bake, or clean. And I get it! Been there, felt that. However, that hesitation is holding them back from SO many unique opportunities to learn and grow. With kid-friendly recipes, constant supervision, and the right strategies, baking can be as easy as it is exciting!
Speaking of easy and exciting activities, make sure you grab my book, Playful by Design! This isn’t a rulebook for teaching your kids how to be independent. It’s a relatable, comforting resource that helps you turn boredom into an opportunity for creativity, thoughtfully plan play spaces, and take a second to catch your breath.
Looking for other ways to get your hands messy in the kitchen? Head to the Mothercould blog, where you can find kid-friendly treats, hidden veggie meals, and lots of family-favorite dinner ideas! And, of course, don’t forget to join the Mothercould In Your Pocket resource. From pre-made home and travel kits to Printable Activity Packs, all the tools (and the community) you need are one click away!